Debian The Universal Operation System: https://www.debian.org/
.t@S8X@SXX@S:
.XS8888888@X@@88@S8S.
%8S88X888 8 8 88 888888S8%
tX@8888X88X;.: %t . ;88S8S@8t.
8@888.8:;X:. . X888888X.
. 8X8888;t . ;t8888 8@
:.XS888; : : 8@8888: .
8 X88: .. ;8888@; 88888:
;tX@8@ . t8@8XSt;S%; .%888@:. :8 .S8. %St
888X. . . S88%;.. .. 8@8t. :X... .S @ ;88XS
t8@8;. %8.: . ;8S8t . t % . 8%
%888. .88. . ;.. 8 8S X 8@@X.X 8X88tS . .;:88;. .@:S %;S888.% :X ;: 88%S
S@8X. t88: . 888: 88%XS8%:8 t. S.X;;t 88;@ %% %S8 .SX 8@@ :S % 8. 8S S:
%88. . 88X t . 8@8@. 8.X ; 8 . t.8. @@. 8 t .@ t ::.S .:% . 8
S88: . 8@X. ;t. 8@88.:%%;. S 8% ;;;S : S .; @.X SX@S@;.S S 8 ; 8
:888% StS@8t. %888@ 8:;. .S 8@ S888@88. X @.8 S X t@. :S@X :@ ; 8
88. . ;S8888X. :%8888S% tt .8 @::. . X t:.t S X @ 8 :::@ X @ ; 8
.@88% ;88@88888888X .. 8;.S; S. %..:. . X : . .X X :8 t ;.S .@ : 8
:8S@ S. ..::X88@ % .:St..;Xt 8 :X St:S;X S8S8;8. .X %8 .X;.8. .8. @
S8888t :: . ;: %;@;t: .8.;:.8.8..:.@ X%t; .%.:; %%S @%t @%%@
8888X . .
8888;
@888; .
8@8%.
;t@8888 .
8888S
.. @88S8t . .
;@XX%t:..
HW required
- Checklist:
- A standard DB9 F/F cable
- A computer with a serial port (or a USB to serial converter)
- A USB stick with at least 512 MB of capacity
- A serial port terminal (Screen or Putty are fine)
- An APU computer ;-) (see below…)
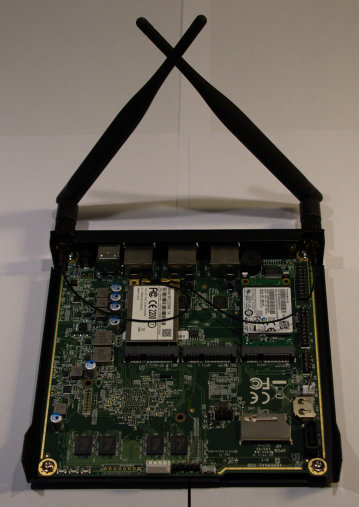
PC Engines (tm) APU2C4 is a small single board computer designed for networking applications.
- The main features of this board are:
- AMD GX-412 TC quad core @ 1GHz with X86-64 instruction set support
- 3 Network Interface Cards
- 3 miniPCI express slots (only one for mSata SSD)
- 4Gb of RAM
- No graphic card

Download Debian Stretch
- Download the latest Debian Stretch netinst CD:
- Go to https://www.debian.org/devel/debian-installer/
- Or with wget:
wget http://cdimage.debian.org/cdimage/stretch_di_rc3/amd64/iso-cd/debian-stretch-DI-rc3-amd64-netinst.iso
Prepare USB stick
Plug the USB key and get its device name using dmesg:
dmesg | tail
[11919.780052] sd 3:0:0:0: Attached scsi generic sg1 type 0
[11919.781177] sd 3:0:0:0: [sdb] 1022463 512-byte logical blocks: (523 MB/499 MiB)
[11919.781808] sd 3:0:0:0: [sdb] Write Protect is off
[11919.781811] sd 3:0:0:0: [sdb] Mode Sense: 00 00 00 00
[11919.782455] sd 3:0:0:0: [sdb] Asking for cache data failed
[11919.782457] sd 3:0:0:0: [sdb] Assuming drive cache: write through
[11919.787939]  sdb: sdb1 sdb2
[11919.790953] sd 3:0:0:0: [sdb] Attached SCSI removable disk
[11920.174374] ISO 9660 Extensions: Microsoft Joliet Level 3
[11920.175382] ISO 9660 Extensions: RRIP_1991A
Become root and write image to the USB stick:
phoenix@z30:~$ su -
Password:
root@z30:~# dd if=/home/phoenix/debian-stretch-DI-rc3-amd64-netinst.iso of=/dev/sdb
593920+0 enregistrements lus
593920+0 enregistrements écrits
304087040 octets (304 MB) copiés, 215.286 s, 1.4 MB/s
root@z30:~# sync
The sync can help if, like me, you have ultra-slow USB sticks.
Configure Serial Port Terminal
Dialout Group
To have access to the serial port as a standard user, make sure to add your username to the dialout group (replacing $USER by your own username if you haven’t configured sudo)
[sudo] usermod -a -G dialout $USER
If you have a standard (ie integrated) serial port, use /dev/ttyS0 instead of /dev/ttyUSB0 in the commands below.
Screen
Screen is the simplest solution. Open a terminal and call screen:
screen /dev/ttyUSB0 115200
And you’re done!
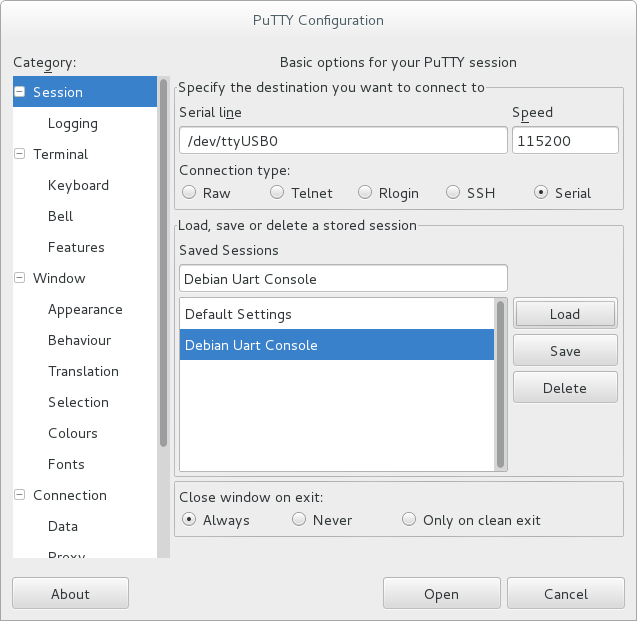
Putty
Configure Putty.

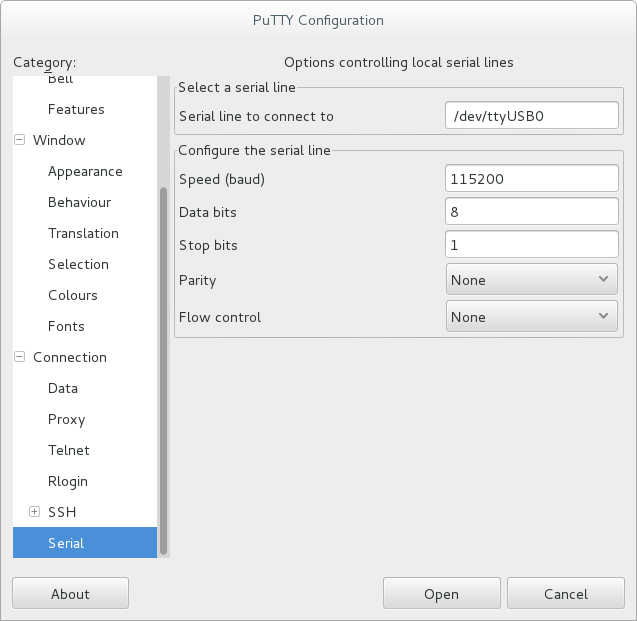
- Once this is done, go to the serial category and configure the port for:
- 115200 bps
- 8 data bit
- 1 stop bit
- no parity
- no flow control

Ready? then open the terminal.
Boot from USB stick
Connect the APU with the serial cable, plug the USB stick and plug the power supply. Wait for the following message on the console and press F10 to select your USB stick as a boot device:
PCengines Press F10 key now for boot menu:
Select boot device:
1. USB MSC Drive ChipsBnk Flash Disk 4.00
2. ata0-0: Samsung SSD 850 EVO mSATA 120GB ATA-9 Hard-Disk (11
3. iPXE (PCI 00:00.0)
4. Payload [memtest]
5. Payload [setup]
Wait for the ISOlinux boot message and select “Install” with the “Down arrow” key then press “TAB”
ISOLINUX 6.03 20170128 EHDD Copyright (C) 1994-2014 H. Peter Anvin et al
+---------------------------------------+
| Debian GNU/Linux installer boot menu  |
|---------------------------------------|
| Graphical install                     |
| Install                               |
| Advanced options                    > |
| Help                                  |
| Install with speech synthesis         |
|                                       |
|                                       |
|                                       |
|                                       |
|                                       |
|                                       |
|                                       |
+---------------------------------------+
Press ENTER to boot or TAB to edit a menu entry
Edit the command line and add console=ttyS0,115200n8:
/install.amd/vmlinuz vga=788 initrd=/install.amd/initrd.gz console=ttyS0,115200n8
At startup, the kernel will complain about the vga mode. Press space to ignore and continue. Follow the remaining debian-installer steps and do not forget to get rid of desktop environment and to force SSH server installation in the Tasksel step of the Debian installation.
Have fun!